
How To Start A Blog For Beginners – The Basics Of Blogging
Hi mommas! Today I will be sharing my personal experience and tips for how to start a blog for beginners.
I often get asked what I do all day as a stay at home mom. My momma friends that work at a normal day job just can’t wrap their heads around the fact that I am home all day and try to understand how I find ways to fill my time and make money to help support the family and household.
The truth is, my daughter fills a lot of my time for me, go figure. But with the downtime I do have, I spend it working on my blog.

Up until I delivered my daughter, I had worked a full-time job or attended school full time. Needless to say, I was always busy, and I liked that. Now, as a stay at home mom, I still find myself very busy, but in a different way.
Laundry, dishes, grocery shopping, diaper changes, and sweeping the floors filled my time but didn’t bring a huge sense of fulfillment to my day.
I found that I was wasting large amounts of time watching television or scrolling through social media, while my daughter napped. After a while, I found that I needed to fill my free time constructively. Don’t get me wrong, downtime like this is very important, and there are times when I still indulge during the day.
However, I realized that I was longing for a sense of purpose and fulfillment and I soon discovered that the way I could fill that void was through starting a blog.
Seeing that my blog has brought me so much purpose, accomplishment, and fulfillment, I wanted to share it with you. So, after almost a year of working on and running my own blog, I wanted to create and easy step by step process for people like you, who are just getting their feet wet in the blogging world.
Keep reading to see how you can start a blog in 10 easy steps! And I promise when I say it’s easy I mean it. I am the furthest thing from a technical guru. So if I can create a blog, you will have no problems creating one yourself, even if you’re a complete novice!
So grab a pen and some paper and a cup of coffee, because although these steps are simple, I want to be as thorough as possible and there’s a lot of explaining that goes into each step. But I promise it will be worth every minute of your time! Let’s get into it!
This is a sponsored blog post. However, all opinions stated are honest and genuine. I do not promote any product that I do not believe in. You can read more by clicking here for my affiliate disclosure.
What Is A Blog?
To understand how to start a blog, we must first ask, what is a blog? You may be thinking to yourself, I already know what a blog is. It’s simple right?
A blog is a website containing collections of posts or articles written over time.
However, the answer to this question isn’t as black and white as you think. The best part of creating a blog is that you can make it anything you want. A blog can be anything from a hobby to an online business. You decide.
When I started Momma Survival Guide, I knew I wanted to create a business out of it, so I built this website around the idea that it was, in fact, an online business. Even though I have no products that I sell, and no online store (we will get into that later).
So really, a blog is what you want it to be and what you make it. That’s the beauty of it, it gives you the freedom to express yourself and to help others.
So before we even get to the step by step of building your blog, decide what you want your blog to be. Is it a business designed to help people learn about new products? Is it a platform where you share personal experiences for the sole purpose of entertainment? It’s up to you.
How To Start A Blog For Beginners – 10 Simple Steps
So before we get into all the details, here is a step-by-step outline for what you can expect to find in this post.
- Pick A Niche
- Choose A Blog/Brand Name And Register your Domain
- Set Up Web Hosting
- Design Your Website By Choosing A WordPress Theme
- Create Your Logo
- Understand And Set Up SEO Tools
- Start Creating Content
- Find High-Quality Photos
- Monetize Your Blog
- Market Your Content
Without further ado, let’s get into the nitty-gritty of starting your blog!
1. Pick A Niche

Okay, so before we even turn on the computer, we have to pick a niche, or in other words, a specific topic that you would like your blog to focus on.
Now, there are a lot of opinions and theories as to what is best when you’re picking a niche. Two of the most popular opinions are to:
- Pick a very specific niche or even a micro-niche (a niche within a niche) Example: Parenting is a niche, Parenting Twins would be a micro-niche
- Pick a very broad niche – Example: Parenting
The argument for choosing the first option and going with a micro-niche is so that you can appeal to a smaller group of people and limit your competition.
The argument for the second option to pick a broad niche is to ensure that you don’t limit yourself.
I can appreciate both arguments and I see validation in both of them. For Momma Survival Guide, I chose a micro-niche (first-time moms) and as my blog has grown, I have expanded into other relevant subjects that apply to the broader parenting niche.
In reality, either option is okay, as long as your blog seems cohesive and on topic. It is important to make sure your blog isn’t all over the place, and that your blog posts are relevant to each other and your niche.
For example, if you chose a niche in parenting, it would be best to avoid writing blog posts about weed killer, or dog leashes. Try to keep your content relevant to the overall topic your blog focuses on so that you can build a brand for yourself and therefore build a loyal following.
In my own opinion, my advice would be to choose a micro-niche. Something that applies to a very specific audience. I especially recommend this to beginners, because if you choose a broad niche such as parenting, you will be lost in the sea of other parenting bloggers.
It is harder to be noticed in a larger niche until you have built a reputation and an authority for yourself. I personally feel that it is always better to start small and expand over time.
If you choose a micro-niche, just be sure to keep your brand name broad so that you can expand your niche over time.
Click here for more tricks to help you find your niche!
Choosing The Right Niche

Another tip I would like to point out, is when choosing a niche, make sure you are very passionate about it. If your focus is to monetize your blog, believe me when I say, you can make money in any niche as long as you are passionate about it.
When I first started blogging, I chose my niche based on the potential earnings I could make, and I wasn’t passionate about the topic at all. Needless to say, it failed rather quickly, and as a result, I made no money from it.
So, as a guideline, I like to say think of 3 potential topics (niches) that you are passionate about. You know the topics that you can’t stop talking about. Is it fitness, crafting, parenting, or even gardening?
Once you’ve come up with your 3 topics, come up with at least 24 blog post ideas that you could write pertaining to each of those niches.
You will find that the niche you are most passionate about, these ideas will come very easily. If they don’t you need to pick a different niche.
When I initially started blogging, the niche I chose was Pest Control. I came up with 4 blog post ideas and then ran out of ideas. That’s when my blog failed. Then, I started Momma Survival Guide, and the day I chose that niche, I came up with 27 ideas for blog posts.
That’s when I knew I was truly passionate about that niche, and almost a year later I am still going strong and even earning money from it!
2. Choose A Name And Register Your Domain
Surprisingly, this can prove to be one of the most challenging parts of starting a blog: choosing a name.
It definitely was for me! Once I had finally figured out my niche, I wracked my brain trying to think of a clever but cute, catchy but not cheesy, broad, but not too broad name for my website.
Let me tell you, it really doesn’t matter that much. Don’t get me wrong, it matters, but please don’t waste days like I did, trying to think of the most perfect name.
Instead, there are many website name generators out there that will combine words that pertain to your niche and they can really spark some great ideas and turn out to be huge time savers.
Here are a couple of sites that I would recommend:
When choosing a domain name, it is best to stick with .com or .org and it is also best to avoid using dashes “-” in your URL. This will give you more authority on Google.
Once you’ve chosen your domain name, it’s time to make sure it’s available and if it is, then it’s time to register! This can all be done through Bluehost, which is the hosting site I use. It makes it easy and combines a few steps. It even tells you if a domain is available or not.
Bluehost even lets you register your domain name for free!
Now I’m sure you’re wondering what is Bluehost? And what is a hosting site? Well, that takes us to step 3!
3. Set Up Web Hosting
Its time to choose a hosting site! But what does that mean? A hosting site is essentially a place to park your website. Think of it like an office space that you rent. When you own a business that needs a storefront, you typically rent out an office space or building. That is what you are doing when you host your website.
Without getting into too much detail and confusion, there are many ways to host a website, but for a blogger, the best way is to be self-hosted, which means you have full control and ownership of your website and all of its content.
With that being said, there is a plethora of hosting sites out there, that you can choose from. The trick is picking the right one.
I use Bluehost and I absolutely love it. I cannot say enough good things about this hosting service. They are extremely affordable (as low as $2.95/month) and they have the best customer service.
Believe me, customer service matters when you run a blog because if you’re like me and you have no clue as to computer programming or coding, that’s where Bluehost Live Chat Support comes in.
Mommas, they have literally saved my website countless times! For example, one time my website was redirecting my pages to an error code (basically no one could access my website due to an error I unknowingly made).
Hyperventilating, I quickly reached out to Bluehost through Live Chat, and they reversed the mistake I had made within minutes, and my site was up and running better than ever.
They’re extremely reliable, helpful and affordable. I actually moved my website from another hosting service, because of their great reviews and I am so happy I did! Thanks to Bluehost my site is running faster, and with their Live Chat, I know I have computer programmers one click away 24/7 to help whenever I need it.
With Bluehost, there are a few packages to choose from upon signing up, I went with the basic package because my site is still small and that’s all I need. Then they give you the option to choose your plan, I chose the 12-month plan. But you can choose anywhere from 12 months up to 36 months.

They have an offer running now, that using my link you can sign up for the 36-month plan for $2.95 per month! Just click my link here to get this offer now! This includes everything you could possibly need as a beginner blogger.
Plus the sign-up process is easy, and even includes the latest version of WordPress downloaded and installed for free.
So lets recap, with Bluehost you get:
- A free registered domain
- Latest version of WordPress for free – downloaded and installed
- Free 24/7 Live Chat support for any assistance you could possibly need
- Prices as low as $2.95/month with my special offer link
- 30-day money-back guarantee
4. Design Your Website
Now onto the fun part, designing your website! Once everything is all set up and running, it’s time to design your website and start building your brand.
Designing your website may sound like a difficult endeavor, but with WordPress, it’s really as simple as choosing a theme. They have thousands of customizable themes, that are sure to fit your style.
To pick a theme, go to your WordPress dashboard. On the right-hand side, there should be a menu, select “Appearance” and under that select themes.
Once you’re on the “themes” page at the top, click the button that says “Add New” and now it’s time to browse. WordPress even has a Feature Filter, to help narrow down the perfect theme for your website.
Once you have found the perfect theme, make sure to uninstall the other themes that you aren’t using. This will help avoid slowing your site speed.
5. Create & Design Your Logo

Now that you have a beautiful website that’s up and running, and your brand is starting to come together, it’s time to add the cherry on top and create your logo.
Now there are many options out there for designing a beautiful logo, and many of those options come with a pretty price tag. As a beginner, I would recommend a free, or at least low cost, logo.
The best way to do this is through a website that I love and rely on for all of my graphic design needs:
With thousands of pre-made logo designs, stickers, shapes, and fonts, you can create a beautifully customized logo at little to no cost.
Once you’ve created your logo, simply download it from Canva.com, and upload it to your new site.
*Some WordPress themes don’t have the option for a logo, in this case, you can put your logo in the sidebar widget.
6. Understand And Set Up SEO Tools
Before we can get to the actual writing part of blogging, it’s important to understand SEO (Search Engine Optimization) or at least the basics of it.
In order to get your blog seen by the world and to create a loyal following, you must do something called keyword research. It sounds much harder than it actually is, thanks to a tool I use called Jaaxy.
Jaaxy is a completely separate program, that helps me find the perfect keyword, to put into my posts so that I can ensure my content is seen on Google.
Simply type in a keyword specific to the topic you want to write about, and focus on these two numbers, the Avg, and the QSR.
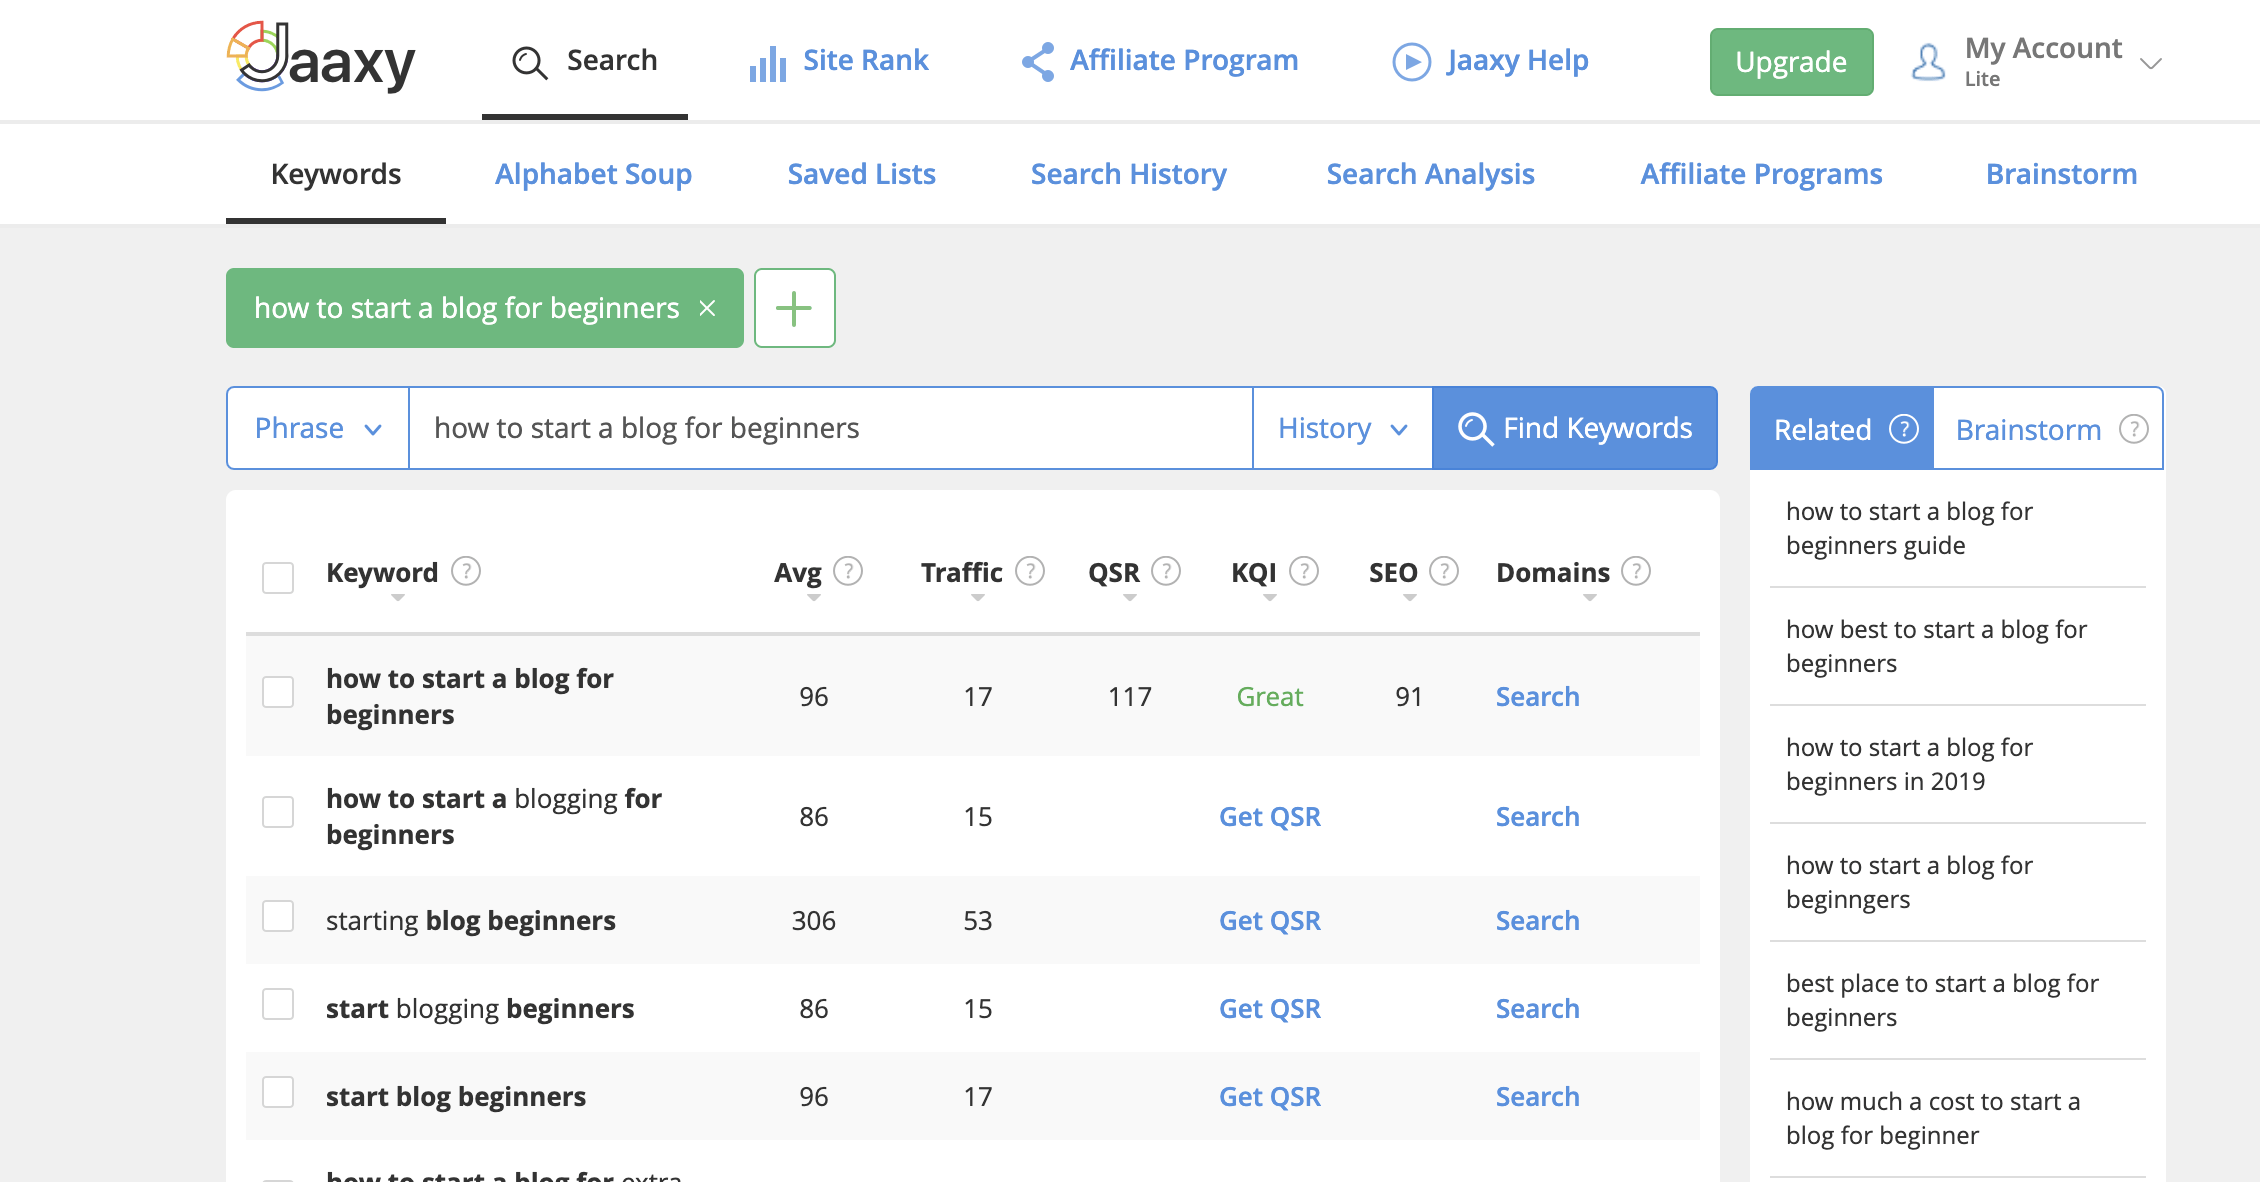
Avg is the number of monthly searches for the keyword, and QSR is your competition.
Now, if you really want to know how to start a blog for beginners and succeed, then pay attention to this – aim for keywords that:
- Makes grammatical sense
- Have an Avg number of 50 or less
- Have a QSR number of 100 or less
This takes time and consistency, but with the right keywords, your blog posts will eventually make it to the first page of Google.
Along with Jaaxy, I also have a plugin installed on my WordPress called All In One SEO. Upon setting up your website and theme, install and activate this plugin. It will be important for helping your website rank in search engines.
7. Create Good Content

Finally, we can get into the blogging part of, well, blogging! Now that everything is set up and running and beautiful, it’s time for the content.
Now there are many suggestions on the best way to write a blog post, but in all actuality, there is one way that readers like best.
When you start writing your content, be sure to break it up into small paragraphs. Paragraphs can literally be one sentence long, just try to keep each paragraph having 3 sentences or less.
This helps with readability and therefore keeps your audience reading longer and more engaged.
Be consistent, and keep its quality. The recommended amount to post for a blog is 2-3 times a week, with blog posts 800 words or more.
That being said, quality is better than quantity. So in order to keep consistently posting quality content 2-3 each week, I recommend writing your content 2 weeks in advance. That way you always have a quality post for the days you are feeling uninspired or when you have a bad case of writer’s block.
8. High-Quality Photos

Along with quality content, you need to have high-quality photos to help your blog look more professional. Think about it, when you are reading a blog post, how do the pictures typically look?
Bright, high resolution, and vibrant. Keep this standard for your blog as well. This will improve your readers’ experience, not only with your writing but your brand as a whole.
Aside from taking your own photos, which I recommend using a DSLR camera to do so, you can also download stock images. In order to find high-quality photos, there are various websites where you can download stock images for free by simply typing in a keyword. Websites like:
I find that many bloggers use these websites, and for that reason, I want my content to stand out. So, I use a paid service to download my images, in order to make my blog more unique. The service I use is called Envato Elements, which actually offers a lot more than just photos. It’s great for video editing, unique font options, audio soundtracks, and more.
Regardless of where you get your pictures, make sure they are legally downloaded, and make sure they are bright, beautiful and fit your overall brand. And use photos frequently! Humans are visual by nature, and photos entice us to click on and even keep reading through a blog post.
9. Monetize Your Blog

Okay, so your blog is up and running on your self-hosted site, it has an awesome theme and logo, and you’ve posted some amazing content with beautiful pictures.
The next step now is to monetize your website and open up the potential for earning an income doing something you love blogging! But how do we do that?
Well, there are many options when it comes to monetizing a blog, however, the top 3 ways that I recommend are:
- Sign up with advertisers, and apply for their programs to sign up to place their ads on your site. A great platform for beginners is Google Adsense.
- Sign up for affiliate programs such as Amazon Associates to add affiliate links to your post and earn a commission when your readers purchase a product through one of your links. (This is my preferred method of monetizing).
- Create and sell your own products. This one takes a lot of skill and dedication, however, it can be a massive source of income. Examples include e-courses, e-books, printables, downloads, etc.
Click here to read more about monetizing your blog.
10. Market Your Content
Now comes the infamous question, how do I get traffic to my website that I’ve worked so hard to create? The answer is to market yourself!
My favorite platform for marketing my blog and all of its content is through Pinterest, and let me tell you almost every other blogger out there will agree with that statement.
There are so many reasons why Pinterest is a blogger’s best friend but I won’t get into that here.
Click here to learn more about marketing your blog using Pinterest.
It’s important to put just as much time, if not more, into marketing your content as you do writing the content. If you want people to see your website, you need to create eye-catching pins, and promote, promote, promote!
My go-to website for creating stunning pins and images is
Canva.com
They make it so easy and even provide free pre-made templates to get you started.
Recap
Phew! Alrighty take a deep breath, stretch your legs, take a quick walk around the room. That was a ton of information, I know. So let’s do a quick recap of everything we’ve learned:
- Decide Your Niche – What are you passionate about?
- Choose A Name And Register your Domain
- Set Up Web Hosting
- Design Your Website By Choosing A WordPress Theme
- Create Your Logo
- Understand And Set Up SEO Tools
- Start Creating Content
- Find High-Quality Photos
- Monetize Your Blog
- Market Your Content
You’re All Set, Happy Blogging!
So, mommas, that’s really all it takes to start your own blog. In 10 simple steps, you can create a masterpiece from scratch, and you don’t even have to have any prior technical experience to do so.
For me, starting a blog was lifechanging. Creating your own blog can set you free and allow you to fulfill your dreams of becoming a stay at home mom if you choose to monetize it. On the other hand, it can act as a creative release if you choose to build your blog as a hobby.
There’s really no limit to what you can do with your blog, as long as your dedicated and consistent. It has opened a huge door for me in my life, from bringing me a sense of accomplishment, to even being a source of income to our family.
If you’ve been wanting to start a blog, and just haven’t pulled the trigger, this is your chance! An amazing opportunity to finally feel free, accomplished, and fulfilled is only a few clicks away. You’ll be happy you did.
I hope you enjoyed this post on how to start a blog for beginners. If you found this helpful, I would love to hear from you. If you still have questions, please reach out in the comments below and I’ll do my best to answer them!
XOXO


You May Also Like

How To Choose A Niche For Your Blog – Using These 4 Simple Tricks